Removing the SkyDrive for Windows App
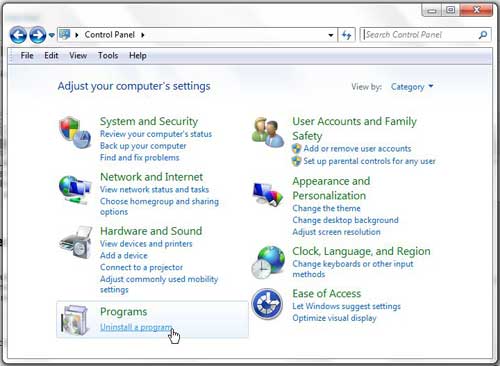
One of the more difficult elements of uninstalling SkyDrive is simply figuring out what it is called. The application in listed among the Programs and Features of your computer, but it is not in the Control Panel or on the Start menu. Continue reading to learn the process for uninstalling the SkyDrive for Windows app. Step 1: Click the Start button at the bottom-left corner of your screen, then click Control Panel. Step 2: Click the blue Uninstall a program link under the Programs section of the window.
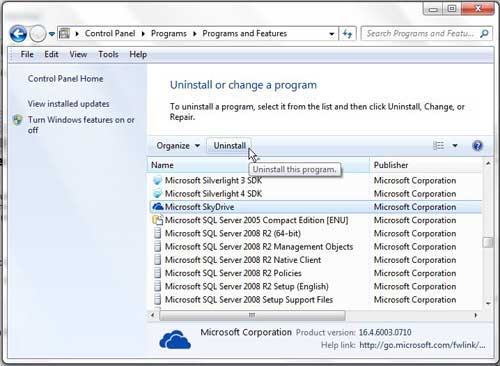
Step 3: Scroll through the list of programs until you locate the Microsoft SkyDrive option, then click it once to select it. Step 4: Click the Uninstall button in the horizontal blue bar above the list of programs.
Step 5: Click Yes to confirm that you want to allow the program to make changes to your computer. The SkyDrive folder will remain in your list of favorites at the left of side of Windows Explorer. If you want to remove the shortcut to the folder from that location, you will need to right-click the folder, then click the Remove option at the bottom of the menu. Additionally, the SkyDrive folder will remain in its’ location on your hard drive, giving you access to the files stored within it. However, making changes to the contents of the folder will no longer affect the files stored online in your SkyDrive account. After receiving his Bachelor’s and Master’s degrees in Computer Science he spent several years working in IT management for small businesses. However, he now works full time writing content online and creating websites. His main writing topics include iPhones, Microsoft Office, Google Apps, Android, and Photoshop, but he has also written about many other tech topics as well. Read his full bio here.
You may opt out at any time. Read our Privacy Policy