Microsoft Word 2010 makes it very simple to insert a table, but the act of customizing the table to make it look good can be a little more difficult. One particular area of concern is the fact that the table is left-aligned in your document by default, which is made more evident if you reduce your column sizes so that the table is not taking up the entire width of the document. Fortunately this is something that you can adjust, so you can simply follow the tutorial outlined below to learn how to center a table in a Microsoft Word 2010 document. The table will then be centered horizontally on the page, despite any other document elements alignments that you may have previously configured.
How to Center a Table in Word – Quick Summary
For additional information, including pictures of these steps, continue to the section below. If you want to middle align text other than inside a table, then our how to center text in Word tutorial can provide you with that information.
Centering Tables in Word 2010
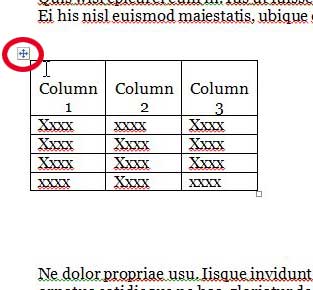
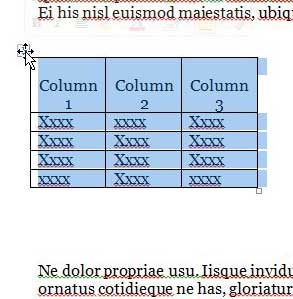
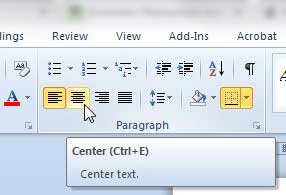
A left-aligned table in Microsoft Word 2010 can look out of place, particularly if it is a table that only has a couple of thin columns. Fortunately this is something that you can adjust by following these simple steps to center your Word 2010 table. Once you’re done, find out how to add more columns to your table, if necessary. Step 1: Open the document containing the table in Word 2010. Step 2: Hover your mouse over the table until you see a small square appear at the top-left corner of the table. Step 3: Click the small square to highlight the entire table. Step 4: Click the Home tab at the top of the window. Step 5: Click the Center option in the Paragraph section of the ribbon at the top of the window. Your table will now be centered on the document. Do you also work with documents in Google Docs? You can find out how to center text in a table in Google Docs if you don’t like the default alignment. Note that centering the table using the method above will center the table object on the page. If, instead, you need to center the table elements within their cells, then use your mouse to select all of the table contents, then click the Center option on the Home tab from step 5 above. If your table isn’t quite big enough for your needs, you can add a row to the end of the table to give yourself some more empty cells. If you’ve been thinking about upgrading to the newest version of Microsoft Office, check out the subscription option. After receiving his Bachelor’s and Master’s degrees in Computer Science he spent several years working in IT management for small businesses. However, he now works full time writing content online and creating websites. His main writing topics include iPhones, Microsoft Office, Google Apps, Android, and Photoshop, but he has also written about many other tech topics as well. Read his full bio here.
You may opt out at any time. Read our Privacy Policy


