One such type of document is one that you create in Microsoft Word. The Microsoft Office word processing application provides many design options, including some tools that allow you to put colors or designs along the outside of your page. You can add a page border to a Word 2013 document by clicking the Design tab, choosing the Page Borders button, then customizing the border with the options on that menu. Word 2013 documents can be modified and edited to a surprising degree, and most of the parts of the page that you can see can be edited in one way or another. You can also use the tools available to you within Word to add new page elements, such as a page border. There are even multiple styles and types of borders that you can add to your Word document, so check out our guide below to begin adding your own page borders.
How to Put a Page Border in a Word Document
Our guide continues below with additional information on adding page borders in Word 2013, including pictures of these steps.
Inserting Page Borders in Microsoft Word 2013 (Guide with Pictures)
These directions are specifically for the 2013 version of Microsoft Word. Directions for earlier versions of Microsoft Word might vary. For example, you can learn about adding page borders in Word 2010 here.
Step 1: Open your document in Word 2013.
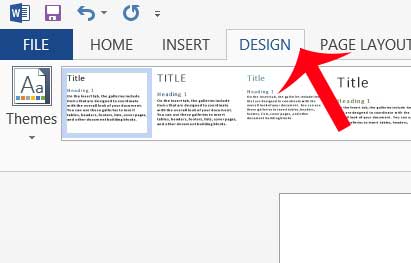
Step 2: Click the Design tab at the top of the window.
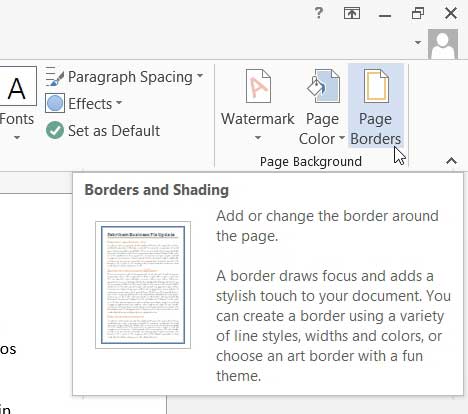
Step 3: Click the Page Borders button in the Page Background section of the navigational ribbon.
The button is near the top-right of the window.
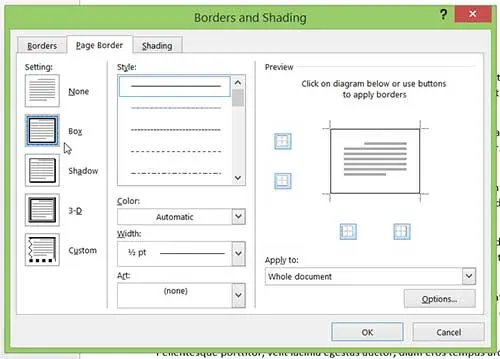
Step 4: Select the type of border that you want to use from the Setting column at the left side of the window.
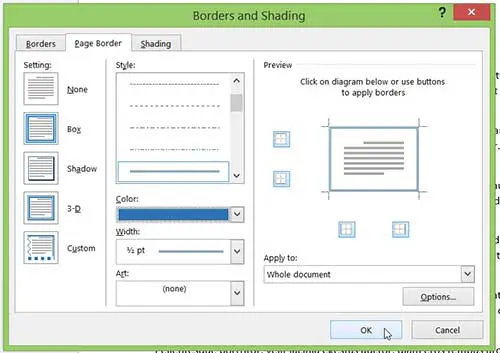
Step 5: Select the Style, Color, Width and Art from the middle section, then click under Apply to at the right side of the window and choose the portion of your document to which you want to add the page border. Click the OK button at the bottom of the window when you have finished to add the border to your document.
Our tutorial continues below with additional discussion on working with page borders in Microsoft Word.
More Information on How to Add a Page Border in Word
While page borders can be fun things to include on a document, many schools and organizations typically don’t want you to use them. If your document has a page border that you need to get rid of, you can remove a page border from a Word document by going to the Design tab, clicking Page Borders, then choosing the None option under Settings. The border style or line style can be adjusted on the Page Border tab of the Borders and Shading dialog box. Specifically, the dropdown menu in the center section labeled “Style.” There you will see a variety of solid and dashed lines that give you a variety of choices for how your page border will look. A page border in Microsoft Word will affect the entire document unless you change the option selected at the bottom right corner of the window. This is a menu labeled as “Apply to.” It will usually default to the “Whole Document” option but you can also choose one of the section options, which includes:
This sectionThis section – first page onlyThis section – all except first page
Aside from the Page Borders menu and the other similar items found in the Page Background group, you can also change the settings for your document through the Page Layout tab. While the items found on this tab won’t include ways to customize your border styles, they will let you change the document size, the number of columns, and much more. Page borders in Microsoft Word 2013 are not just restricted to the entire page. You can read this tutorial to learn how to add borders to individual words or paragraphs as well.
Additional Sources
After receiving his Bachelor’s and Master’s degrees in Computer Science he spent several years working in IT management for small businesses. However, he now works full time writing content online and creating websites. His main writing topics include iPhones, Microsoft Office, Google Apps, Android, and Photoshop, but he has also written about many other tech topics as well. Read his full bio here.
You may opt out at any time. Read our Privacy Policy


