We have previously written about adjusting the send and receive frequency in Outlook 2010 but, with the release of Outlook 2013, the process has changed slightly. Outlook 2013 uses Send/Receive Groups to define the schedule with which your messages are sent and your email server is checked. This allows you to specify different groups of account in Outlook 2013 or, in what is likely to be the most common situation, specify those settings for all of the accounts that you have configured in the program. So continue reading below to learn the necessary steps for adjusting the Outlook 2013 send and receive frequency. If you are looking for an affordable way to purchase Outlook 2013, consider the Office 365 subscription. For a low yearly fee, you get the entire Office suite, as well as 20 free GB of SkyDrive space.
How to Change Outlook Send Receive Frequency in Outlook 2013
Our article continues below with additional information on changing the Outlook send and receive frequency, including pictures of these steps.
Send and Receive More or Less Frequently in Outlook 2013 (Guide with Pictures)
I always like to have Outlook checking for new messages as often as possible, because it allows me to take action on new messages as quickly as possible. I do not notice a discernible slowdown of my computer as a result of more frequent checks, so I find it to be a helpful adjustment. But if your situation is different and you want to increase or decrease the default 5 minute check frequency, you can follow the directions below to do so.
Step 1: Launch Outlook.
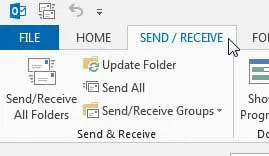
Step 2: Click the Send/Receive tab at the top of the window.
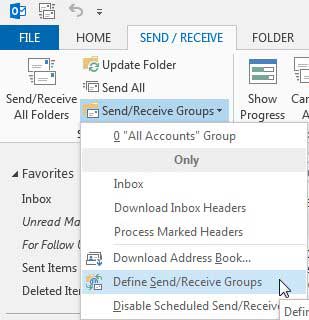
Step 3: Click the Send/Receive Groups drop-down menu in the Send & Receive section of the ribbon, then click the Define Send/Receive Groups option.
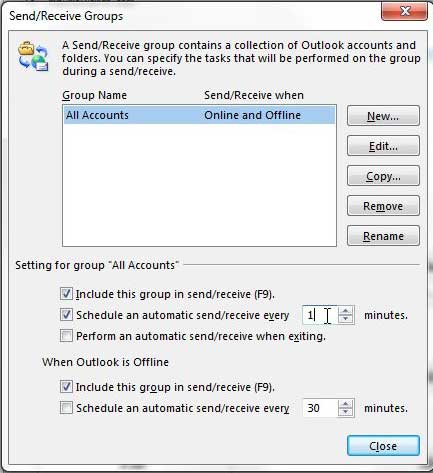
Step 4: Click the group for which you want to make changes (if you have not defined groups, then you can just use the default All Accounts selection).
Step 5: Change the value in the field to the right of Schedule an automatic send/receive every to the number of minutes that you want between each check.
Note that I have set it to check every 1 minute.
Step 6: Click the Close button to apply your changes.
As mentioned previously, the send/receive settings in Microsoft Outlook will only apply to the accounts that are included in the group you selected. Are you distracted by the weather information on your Outlook 2013 calendar? You can read this article to learn how to disable it.
Additional Sources
After receiving his Bachelor’s and Master’s degrees in Computer Science he spent several years working in IT management for small businesses. However, he now works full time writing content online and creating websites. His main writing topics include iPhones, Microsoft Office, Google Apps, Android, and Photoshop, but he has also written about many other tech topics as well. Read his full bio here.
You may opt out at any time. Read our Privacy Policy